
Creating a Seasonal Flat Lay
The year as we know it is not divided into four equal structured seasons as the calendar would have us believe. Leave the garden for just a few days & you will be surprised at how much has changed when you return. I wonder does it really grow this much while I am here? Or is a kind of magic at play, some type of gardening wizardry that shows you just how little control you have over your space. A blatant disregard for carefully tended edges, hops tangling their way through anything in their path, swallowing up the flower bed.
Within each season there is a series of smaller seasons. Each day moving us closer to the next expression of the seasonal year. With spring comes a first early spring that straddles the border of winter & spring, it brings us snowdrops & hellebores & begins to awaken all of our senses again after our quiet winter. Creating a seasonal flat lay is an amazing way to create a visual garden diary to record what is flowering or ready for harvest each month. It becomes a beautiful exercise in mindfulness, wandering around selecting pieces to incorporate & trains your eye to become observant, tapping in to what is changing in the garden. If you are wanting to take a photo or create with any seasonal items it is good to do it while you have the idea, otherwise turn around & they can be past their best.
Creating your flat lay:
Select a background: I think that this is the single most important decision that will influence the overall feeling of your image. There are so many options to choose from; tiles, wooden or concrete flooring, a tabletop or specialist vinyl background, really the possibilities are endless. I always choose a natural background as it suits the earthy feel of my images - consider what would suit the type of image you want to create (this is an old rustic baking tray that I have used).
Gather props: Put together a little collection of items that you want to include in your flat lay. It is essential that all of the items that you include add to the story you want to tell & have relevance otherwise the image loses its authenticity. Is there a common thread that ties them all together? A cohesive colour scheme can be an easy way of creating more harmony in the image especially if there is lots of items to be included. Select a range of sizes and weights of items to create balance within the image.
Position for taking the shots: Create your flat lay inside where there is no breeze to create havoc! Choose a spot close to a window, with bright & even yet indirect light. I create mine beside a door that has frosted glass which creates perfectly diffused light. Play with the orientation of your flat lay to see how the shadows will fall when you have the objects laid out. We want as little as shadow as possible so use a reflector (this can be as simple as a piece of white paper or cardboard) to reflect light back into the shadows if need be.
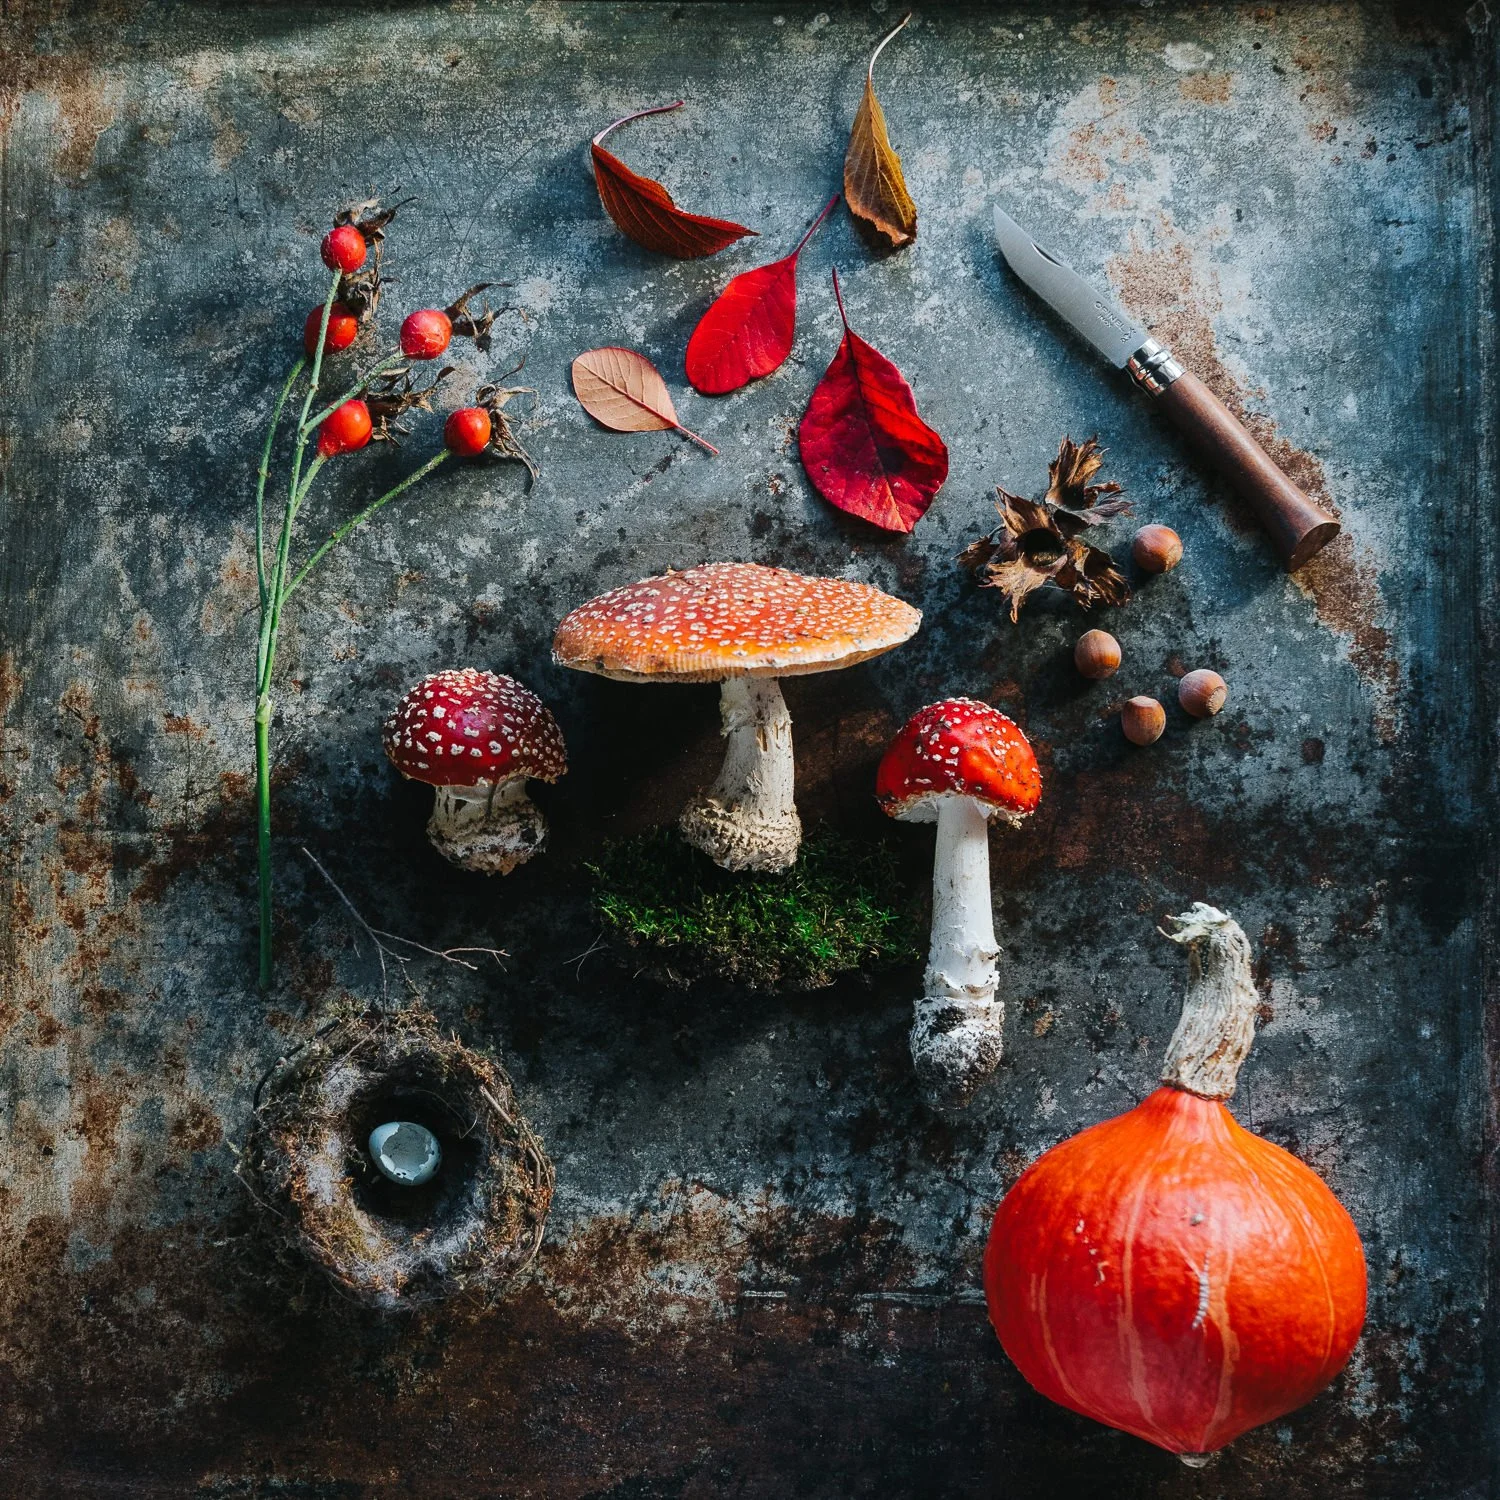
Layout: Start with the main character in your story & place in the centre or just off centre.
Add the largest items to the bottom half of the flat lay, this creates a sense of balance. If you have anything really big you can put it in one of the bottom corners or half out of the frame.
Next add the smaller items. It is good to include items of varying sizes to create interest. Also choose some items with texture to create depth in the image.
It is important to create some negative space by leaving some areas of the image empty. You can still have an maximalist image with lots of items but there needs to be a little space to give the eye a rest.
Layer items on top of each other to add depth & a sense of 3 dimensionality. A subtle example of this is the broken eggshell nestled into the nest. Other examples could also be adding a cup of tea sitting on top of book or a pen lying on an open journal.
Add in little supporting details that help to tell the story, for example the pocket knife I used for gathering the autumnal pieces. Although these are little details I think these are the elements that really bring the image to life. A fallen petal beside a flower or tiny pair of antique flower snips.
Camera setup: Ensure that the camera is directly over top of your flat lay and is perfectly flat. A tripod is absolutely the best way to go about this. Shoot a little wider than you need to and then you can crop when editing.
Taking the photo: Set the camera to a 2 second delayed timer so there is no camera shake when you press the shutter, this will ensure a crisp image. Take some test shots and see if there is any adjustments that you need to make. You may find that some items need to be moved around, keep on playing and taking extra shots until you are happy with the final image.
Please note: do not eat the Fly Agaric mushrooms in my photo, I picked them to include in the photo purely for a record of what was in my garden at the time!